A printer box that boasts “4800 DPI” next to a photo labelled “300 DPI” looks like a mismatch waiting to be fixed. It is easy to conclude that the printer is far better than the photo needs, or that the photo should somehow be raised to 4800 DPI to match. Both conclusions are wrong, because the two numbers do not measure the same thing at all.
Printer DPI counts ink dots. Image DPI counts picture pixels. A dot is a speck of ink; a pixel is a unit of picture information. One pixel is typically rendered by many printer dots, and no printer setting can turn a low-pixel photo into a high-pixel one. Once that distinction is clear, most print confusion — oversized files, disappointing enlargements, and printer settings that seem to change nothing — falls away.
Two different measurements that share one name
| Measurement | What it counts | Where it comes from | What it decides |
|---|---|---|---|
| Image DPI | Pixels per inch in your file at a given print size | Pixels ÷ print size in inches | How much detail the print can show |
| Printer DPI | Ink dots per inch the printer can place | The printer’s hardware and driver setting | How finely ink is laid down to reproduce each pixel |
Image DPI is not stored in the photo as a fixed property. It is a calculation: take the pixel dimensions of the file, divide by the size you print it at, and you get the effective image DPI. The same file printed at two sizes has two different image DPIs. Printer DPI, by contrast, describes the machine: the finest grid of ink dots it can place on paper, in each direction.
The guide What Is 300 DPI? explains the image side in detail, and DPI vs PPI: What’s the Difference? separates print DPI from screen PPI, a third number that is often mixed into the same confusion.
One pixel, many dots
Here is the arithmetic that makes the relationship concrete. If an image is printed at 300 image DPI and the printer is set to 1200 printer DPI, then along each inch the printer places 1200 dots to reproduce 300 pixels:
1200 ÷ 300 = 4 dots across each pixel
Across both dimensions, each pixel is therefore rendered by 4 × 4 = 16 printer dots. Those dots are not 16 separate pieces of picture detail. They are the printer’s way of mixing colours and smoothing edges within a single pixel: different combinations of cyan, magenta, yellow and black dots, placed in slightly different positions, produce the shades the eye perceives as that pixel’s colour.
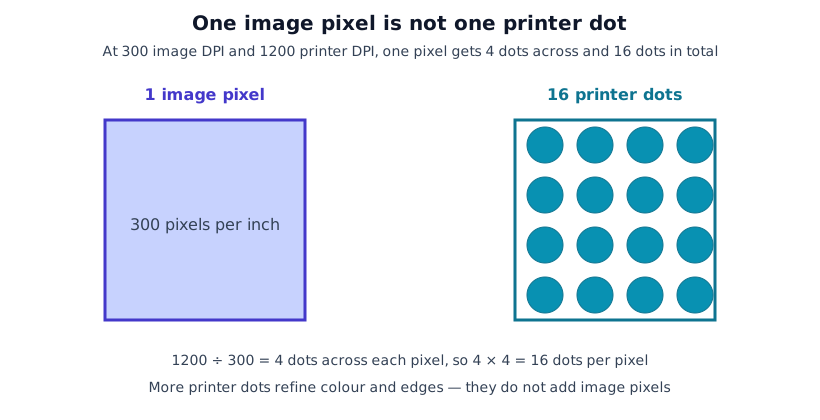
At a higher printer setting the grid gets finer still. At 4800 printer DPI and 300 image DPI, the ratio is 4800 ÷ 300 = 16 dots across each pixel, or 16 × 16 = 256 dots per pixel. That is a much finer ink grid — useful for subtle colour gradations and very fine lines — but the picture still contains exactly 300 pixels per inch of information. The printer has not added detail; it has reproduced the same detail more smoothly.
This is also why a specification written as two numbers, such as 4800 × 1200 DPI, needs reading carefully. The first number is the horizontal dot density and the second is the vertical dot density, and they need not be equal. A printer’s mechanism may place dots more densely across the page than along the direction of paper travel. Neither number is your image’s DPI, and multiplying them together does not give a meaningful “total DPI” for your photo.
Worked example: the same photo at three print sizes
Take a 6000 × 4000 pixel photo, which is 24 megapixels (6000 × 4000 = 24,000,000). Its effective image DPI depends only on the print size, not on the printer:
| Print size | Effective image DPI | Calculation |
|---|---|---|
| 20 × 13.3 inches | 300 | 6000 ÷ 20 = 300; 4000 ÷ 13.3 ≈ 300 |
| 40 × 26.7 inches | 150 | 6000 ÷ 40 = 150; 4000 ÷ 26.7 ≈ 150 |
| 83.3 × 55.6 inches | 72 | 6000 ÷ 83.3 ≈ 72; 4000 ÷ 55.6 ≈ 72 |
Check the middle row: 6000 ÷ 150 = 40 inches wide and 4000 ÷ 150 ≈ 26.7 inches high. Now print that 40 × 26.7 inch poster on two different printers, one at 1200 DPI and one at 4800 DPI. The image DPI is 150 in both cases, because the file and the size have not changed. The 4800 DPI printer will lay down a finer dot pattern — 4800 ÷ 150 = 32 dots across each pixel, or 1024 dots per pixel — but it is still reproducing the same 150 pixels per inch. Viewed from poster distance, the two prints will look very similar; viewed very closely, the finer printer may show smoother gradients, but neither print will show detail that is not in the 6000 × 4000 file.
You can run your own numbers with the Print DPI Calculator: enter pixel dimensions and print size and it returns the effective image DPI directly. The DPI Calculator does the same from an uploaded image.
Why raising the printer setting cannot rescue a small photo
A common experiment goes like this: a photo looks soft when printed, so the printer is switched to its highest DPI setting, and the print comes out looking exactly the same. That is not a fault. The softness was in the image DPI, and the printer setting never touched it.
Take a 1000-pixel-wide photo printed 10 inches wide. Its effective image DPI is 1000 ÷ 10 = 100, whatever the printer does. At 100 DPI, each pixel covers one hundredth of an inch — large enough for the eye to notice up close, so edges look stepped and fine detail looks blurred. Setting the printer to 4800 DPI means each of those large pixels is rendered with 48 dots across (4800 ÷ 100 = 48), but the pixel itself is still one hundredth of an inch wide. The printer has faithfully reproduced a low-detail image at high dot precision.
The only fixes for low image DPI are the ones that change the pixels or the size: print smaller, accept the lower DPI at a greater viewing distance, use a higher-pixel original, or upscale with the honest understanding that upscaling guesses new pixels rather than recovering real detail. Changing a DPI label in the file metadata is not a fix either: it only changes the default print size software suggests. The Change Image DPI tool is explicit about this — it updates metadata, it does not resample the image — and the Image DPI Checker shows what DPI metadata a file actually contains, or says plainly when none is stored.
Common mistakes
Demanding 4800 DPI from an image. A file does not need to be 4800 DPI, and no ordinary camera or scanner produces one. Asking a print shop for “4800 DPI” when you mean “high quality” usually just creates confusion: the shop hears a printer specification, not an image requirement. Ask for the print size and the image DPI you need — 300 DPI for a close-up photo is the standard request.
Judging a printer by its headline DPI alone. Two printers with the same headline DPI can produce visibly different prints, because ink type, paper, droplet size, colour management and driver quality all matter. Conversely, a modest-DPI printer with good inks and paper can outprint a high-DPI printer on poor paper. Headline DPI is one specification, not a quality score.
Confusing DPI with print quality settings. Many printer drivers offer “Draft”, “Normal” and “Best” quality modes, and the highest mode may use the highest DPI. But “Best” also changes ink usage, print speed and sometimes paper handling. If a draft print looks banded or pale, the cause may be ink saving rather than dot density, and the fix is the quality mode, not a misunderstanding about image DPI.
Resampling a photo up to a printer’s DPI. Some software offers to resample an image to 4800 DPI before printing. For a 6 × 4 inch print, that would mean 6 × 4800 = 28,800 pixels wide — a file 16 times wider than a 300 DPI version, with no new detail, only interpolated guesses and a vastly larger file. It slows printing, risks software errors, and gains nothing the printer would not have done itself by placing its own dot grid over the original pixels.
Forgetting viewing distance. Image DPI targets exist because of viewing distance, not because 300 is a magic number. A poster at 150 DPI viewed from two metres looks sharp; the same poster at 150 DPI examined from 15 centimetres looks soft. Judge image DPI against how the print will actually be viewed, as the guide How to Choose the Right Image Resolution for Printing explains, and use the printer’s DPI setting for what it is: a fine control over ink placement, not a cure for insufficient pixels.
What to actually check before printing
- Find your file’s pixel dimensions — the real, final, cropped dimensions, not the camera original.
- Divide pixels by inches for your target print size. That is your effective image DPI; the How to Calculate Image DPI guide walks through the formula.
- Judge that number against viewing distance: about 300 DPI for close-up prints, about 150 DPI for posters, lower for banners.
- Choose a sensible printer setting for the paper and job — the printer’s “Best” photo mode on photo paper is usually the right choice — without expecting it to change the image DPI.
- Print a small test section at full size and view it from the real viewing distance before committing to the whole print.
Frequently asked questions
Is a 4800 DPI printer better than a 1200 DPI printer for photos?
Not automatically. Printer DPI counts ink dots, not image detail. Once a printer can place enough dots to render a 300 DPI image smoothly, extra printer DPI mainly refines colour blending and fine edges. A sharper result still depends on the photo having enough pixels for the print size.
What image DPI should I use for printing?
Use 300 DPI for close-up prints such as photos and A4 pages, around 150 DPI for posters viewed from a step back, and lower DPI for banners seen from metres away. Divide your pixel dimensions by your print size in inches to find the effective image DPI — that number, not the printer’s specification, decides whether the print looks sharp.
Does changing my printer setting to 4800 DPI improve a low-resolution photo?
No. The printer setting changes how finely ink is placed, but it cannot invent pixels that were never in the file. A 1000-pixel-wide photo printed 10 inches wide is still 100 DPI, however high the printer DPI is set, and it will still look soft up close.
Why does a printer specification sometimes show two numbers, such as 4800 × 1200 DPI?
The two numbers are the horizontal and vertical dot densities, and they are not always equal. They describe how the printer places ink in each direction. Neither number is the DPI of your image, and neither tells you how many pixels your photo needs.
Bottom line
- Printer DPI counts ink dots per inch; image DPI counts pixels per inch at a given print size. They share a name, not a meaning.
- At 1200 printer DPI and 300 image DPI, each pixel is rendered by 16 dots; at 4800 printer DPI, by 256 dots. Finer dots smooth colour — they do not add detail.
- A 6000 × 4000 photo is 300 DPI at 20 × 13.3 inches, 150 DPI at 40 × 26.7 inches, and 72 DPI at 83.3 × 55.6 inches, on any printer.
- No printer setting, DPI label change, or resampling to 4800 DPI can rescue a photo that lacks pixels for its print size.
- Before printing, divide pixels by inches, judge the result against viewing distance, and let the printer do what it is for: placing ink finely over the pixels you actually have.