A print shop asks for your banner artwork, and the first question is usually “what DPI?” The instinctive answer — 300 DPI, because that is the number everyone quotes for printing — is correct for a photograph held in your hand. For a banner or hoarding, it is usually wrong, and following it can turn a straightforward job into an unmanageably large file, a failed upload, or a needless re-shoot.
The reason is simple: sharpness is not a property of the file alone. It is a property of the file, the print size, and the distance from which the print is viewed. A banner is not examined at reading distance. It is read from across a room, across a street, or from a moving vehicle. As that distance grows, the detail the eye can actually resolve falls quickly — and so does the DPI the print needs.
The one rule that matters: DPI falls as distance grows
Image DPI is always the same calculation: pixels divided by inches. A 8,640-pixel-wide image printed 120 inches wide is 8,640 ÷ 120 = 72 DPI, whatever the subject is. What changes with banners is not the formula but the target. The target is set by how far away the viewer’s eye is, because the eye has a resolution limit of its own.
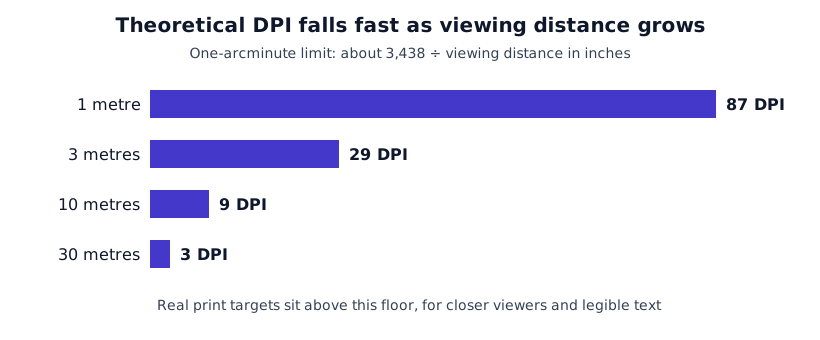
Human vision can separate details down to roughly one arcminute — one sixtieth of a degree. That limit gives a neat formula for the theoretical DPI at which individual pixels just stop being separable:
Theoretical DPI ≈ 3,438 ÷ viewing distance in inches
The number 3,438 comes from 1 ÷ tan(1/60°), the geometry of that one-arcminute angle. It is a floor, not a print specification: at or above it, pixels blend together; below it, a keen eye at exactly that distance could in principle start to pick them apart. Real print targets sit above this floor, because viewers move closer than the nominal distance, text needs to stay legible, and print processes are not perfect. But the floor shows why the numbers collapse so fast with distance:
| Viewing distance | Theoretical DPI floor | Sensible working range |
|---|---|---|
| 1 metre (about 3 feet) | 87 | 100–150 DPI |
| 2 metres (about 7 feet) | 44 | 72–100 DPI |
| 3 metres (about 10 feet) | 29 | 50–72 DPI |
| 5 metres (about 16 feet) | 17 | 30–50 DPI |
| 10 metres (about 33 feet) | 9 | 20–30 DPI |
| 20 metres (about 66 feet) | 4 | 15–25 DPI |
| 30 metres (about 100 feet) | 3 | 10–20 DPI |
These working ranges are rules of thumb used across large-format printing, not a standard imposed by any printer manufacturer, and they deliberately include a safety margin above the theoretical floor. The key pattern is what matters: doubling the viewing distance roughly halves the DPI you need. A banner viewed from 10 metres does not need half the DPI of a close-up print — it needs roughly a thirtieth of it.
The guide How to Choose the Right Image Resolution for Printing covers the same principle for ordinary print sizes, and How to Calculate Image DPI walks through the pixels-divided-by-inches formula step by step.
Worked example 1: a 6 by 3 metre hoarding
Take a hoarding 6 metres wide and 3 metres high. Convert to inches first — 1 metre is 39.37 inches, so the hoarding is 6 × 39.37 = 236.22 inches wide and 3 × 39.37 = 118.11 inches high.
Now multiply by the target DPI:
| Target DPI | Pixels wide | Pixels high | Total megapixels |
|---|---|---|---|
| 15 DPI | 3,543 | 1,772 | 6.3 |
| 30 DPI | 7,087 | 3,543 | 25.1 |
| 72 DPI | 17,008 | 8,504 | 144.6 |
| 300 DPI | 70,866 | 35,433 | 2,511 |
Check the 30 DPI row: 236.22 × 30 = 7,086.6, rounded to 7,087 pixels, and 118.11 × 30 = 3,543.3, rounded to 3,543 pixels. Multiply them: 7,087 × 3,543 ≈ 25,109,000 pixels, or 25.1 megapixels — comfortably within reach of a modern camera or a good stock image.
Now look at the 300 DPI row. It demands a 2,511-megapixel file. No camera produces that, no designer exports it casually, and no viewer standing metres away could see the difference: at a typical hoarding viewing distance of 10 metres or more, even the 30 DPI version already carries more than three times the theoretical floor of about 9 DPI. The 72 DPI version, at 144.6 megapixels, is also far more than the job needs, though a print shop may still accept it if the file already exists at that size. The point is that you do not need to create it.
Run your own size through the Banner Resolution Calculator: enter the banner dimensions and a target DPI and it returns the pixel dimensions required, so you can check a real file against a real size instead of guessing.
Worked example 2: a 10 by 4 foot event banner
Feet are easier here: 10 feet is 120 inches and 4 feet is 48 inches. The pixel requirements at three different targets are:
- At 50 DPI: 120 × 50 = 6,000 pixels wide and 48 × 50 = 2,400 pixels high, which is 6,000 × 2,400 = 14,400,000 pixels, or 14.4 megapixels.
- At 72 DPI: 120 × 72 = 8,640 pixels wide and 48 × 72 = 3,456 pixels high, which is 8,640 × 3,456 = 29,859,840 pixels, or about 29.9 megapixels.
- At 150 DPI: 120 × 150 = 18,000 pixels wide and 48 × 150 = 7,200 pixels high, which is 129.6 megapixels — a very large file for a banner most people will view from several metres away.
For an event banner mounted on a stand or a wall, where the nearest viewers stand roughly 2 to 3 metres back, the 72 DPI version is a sensible target and the 50 DPI version is usually acceptable. The 150 DPI version buys nothing visible at that distance and only slows down export, upload and printing. If the same banner will also be inspected close up — a trade-show backdrop that visitors walk right up to, for instance — aim for the higher end of the range, or accept that the closest inspection will look slightly soft. That trade-off should be a conscious decision, not an accident discovered after printing.
Worked example 3: what an ordinary photo can cover
Turn the calculation around. A common 24-megapixel photo is 6,000 × 4,000 pixels. How large can it go?
- Printed 20 feet (240 inches) wide, its effective DPI is 6,000 ÷ 240 = 25 DPI. That is fine for a hoarding viewed from 10 metres or more, where the working range is roughly 20 to 30 DPI.
- Printed 10 feet (120 inches) wide, it is 6,000 ÷ 120 = 50 DPI — suitable for a banner viewed from a few metres.
- Printed 3 metres (118.11 inches) wide, it is 6,000 ÷ 118.11 ≈ 51 DPI, again in banner territory.
- Printed 2 metres (78.74 inches) wide, it is 6,000 ÷ 78.74 ≈ 76 DPI — good for a display viewed from about 2 metres.
So a single ordinary photo can cover a genuinely large banner, provided the viewing distance matches. The mistake is judging the photo by its megapixel count alone, or by a 300 DPI rule borrowed from photo printing. Judge it by pixels divided by inches, then compare that number with the distance table above. The Print DPI Calculator does exactly this check: enter pixel dimensions and print size and it returns the effective DPI. The Poster Resolution Calculator and Photo Print Size Calculator cover the neighbouring cases — posters viewed from a step back, and the largest size a given photo supports at a chosen DPI.
Why print shops sometimes still ask for more
If lower DPI is fine, why do some print shops ask for 100 DPI or 150 DPI for a banner? There are legitimate reasons, and they are worth understanding rather than dismissing:
Close inspection. A banner at a trade show, in a shop window, or along a walkway will be approached. Print shops build in margin for the nearest viewer, not just the average one. If your banner will be read at arm’s length, it is not really a distant-viewing job, and the distance table should be read at the closest realistic distance.
Text and logos. Large, bold headline text survives low DPI well. Small text, thin lines, and detailed logos do not. A hoarding whose headline is a metre tall can be printed at 20 DPI; the same hoarding carrying a paragraph of small print needs either a higher DPI or a redesign that moves the small print to a separate, closer panel.
The print process. Vinyl banners, fabric displays, and billboards are printed at different native resolutions, and a shop may ask for a file at its machine’s preferred input resolution to avoid its own resampling surprises. That is a workflow preference, not a law of optics. If the shop asks for 100 DPI, supply 100 DPI if you have the pixels — just do not manufacture them by upscaling a smaller file and pretending the detail is real.
Cropping and safety margins. Artwork is usually supplied with bleed and safe areas, and the file may be cropped or scaled slightly in production. A small margin above the minimum DPI protects against that. A margin of one step — say 50 DPI where 30 DPI would do — is sensible insurance. A margin of ten steps, to 300 DPI, is not.
Common mistakes
Applying the 300 DPI rule to every print size. This is the single most expensive mistake in large-format work. It produces files hundreds of times larger than necessary — 2,511 megapixels for the 6 by 3 metre hoarding above — that choke design software, fail uploads, and slow printing, all for detail nobody can see from the real viewing distance.
Judging a file by its DPI label instead of its pixels. A file labelled 300 DPI is not automatically suitable for a banner. What matters is the pixel count. A small image labelled 300 DPI might be 1,500 pixels wide, which printed 10 feet wide is only 1,500 ÷ 120 = 12.5 DPI — too low even for a distant hoarding. Always divide pixels by inches for your actual size; the Image DPI Checker shows what a file really contains, including when no DPI metadata is stored at all.
Forgetting the closest viewer. The distance that matters is the shortest distance from which anyone will actually look at the print, not the distance from the road or the far side of the hall. A roadside hoarding seen by drivers at 30 metres and by pedestrians at 3 metres should be judged at 3 metres for its text, or designed so the fine detail is not the part pedestrians need to read.
Upscaling to hit a target DPI. Resampling a 3,000-pixel-wide image up to 9,000 pixels does not add detail; it interpolates guesses between existing pixels. The effective DPI on paper rises, but the visible sharpness does not, and the file gets nine times larger. If the original is genuinely short of pixels for the size and distance, the honest fixes are a smaller print, a higher-resolution original, or a design that relies less on fine detail.
Designing small text for a distant banner. Text that is legible on screen at full size can be unreadable on a hoarding from the street. Print a test strip at full size — even a small section on the actual material — and view it from the real distance before committing to the full print. A test strip costs little; a reprint costs the whole job.
A practical checklist before you send artwork
- Measure the finished print size in inches, including any bleed the shop asks for.
- Find the closest realistic viewing distance, not the average one.
- Pick a target DPI from the distance table — or ask the print shop for its preferred input DPI and compare it with the table so you understand any gap.
- Multiply inches by DPI in each direction to get the required pixels, and compare with the pixels your file actually has.
- Check small text and logos separately: if they are the weak point, raise the DPI for the whole job or move the fine detail to a closer panel.
- Print a full-size test section and view it from the real distance, on the real material, before approving the full run.
Frequently asked questions
What DPI should a banner be printed at?
It depends on viewing distance, not on a single standard number. A banner read from about a metre away suits roughly 100 to 150 DPI, a banner viewed from a few metres suits roughly 50 to 72 DPI, and a large hoarding viewed from ten metres or more is often fine at roughly 20 to 30 DPI. Always check the effective DPI for your exact size by dividing pixels by inches.
Why do large hoardings not need 300 DPI?
Because the eye cannot resolve fine detail from far away. At ten metres, the theoretical limit for resolving individual pixels is about 9 DPI, so a 30 DPI hoarding already carries several times more detail than the eye can separate at that distance. Printing it at 300 DPI would demand an enormous file for no visible gain.
How do I calculate the pixels needed for a banner?
Multiply the print size in inches by the target DPI in each direction. For example, a 10 by 4 foot banner is 120 by 48 inches, so at 72 DPI it needs 120 × 72 = 8,640 pixels wide and 48 × 72 = 3,456 pixels high, about 29.9 megapixels in total.
What if my photo is not high enough resolution for the banner size?
First check the viewing distance — a lower effective DPI may still be perfectly acceptable for a distant hoarding. If it is not, print smaller, use a higher-resolution original, or redesign so that small text and fine detail sit on a smaller panel that viewers can approach. Upscaling guesses new pixels; it does not recover real detail.
Should I still send a 300 DPI file for a large banner?
Only if the file is genuinely that large and the print shop asks for it. Forcing a small image up to 300 DPI at banner size only inflates the file — for a 6 by 3 metre hoarding it would mean roughly 70,866 by 35,433 pixels — without adding any detail the printer or the viewer can use.
Bottom line
- Effective DPI is always pixels divided by inches. Viewing distance decides what that number needs to be.
- The eye’s one-arcminute limit gives a theoretical floor of roughly 3,438 ÷ viewing distance in inches: about 87 DPI at 1 metre, 29 DPI at 3 metres, and 9 DPI at 10 metres.
- Sensible working ranges sit above that floor: roughly 100–150 DPI at a metre, 50–72 DPI at a few metres, and 20–30 DPI at ten metres or more.
- A 6 by 3 metre hoarding needs only about 7,087 × 3,543 pixels at 30 DPI — 25.1 megapixels — while 300 DPI would demand an absurd 2,511 megapixels.
- A 10 by 4 foot banner needs 8,640 × 3,456 pixels at 72 DPI, about 29.9 megapixels.
- Judge every banner by its closest realistic viewer, check small text separately, and print a full-size test strip viewed from the real distance before approving the run.